Cool Finds: $4 Waterproof Keyboard??

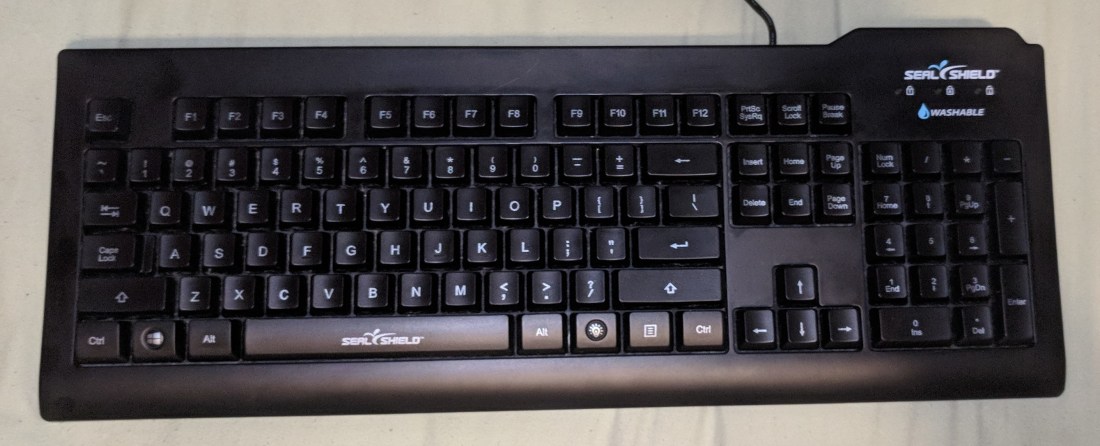
So I was looking through some of the keyboards at work the other day when I found this:

waterproof

A waterproof and backlit keyboard for $4. What a steal! Why would this keyboard only be $4 you might ask?

Well there is one very, very, small issue:

3

The USB cable is a minuscule 7.5 inches in length. This makes this keyboard virtually unusable for most desktop users. However, laptop users who prefer a full-size keyboard  won’t be as affected by this fun-sized cord. In fact, it may prove to be less bulky to transport and provide a space saving alternative for those who are on-the-go. Now if someone wanted to use this keyboard badly enough, they could purchase a USB extension cable for about $4 and give this a normal sized cord. So it isn’t all that bad, and $8 is still a killer deal for a keyboard that has these sort of features.

4

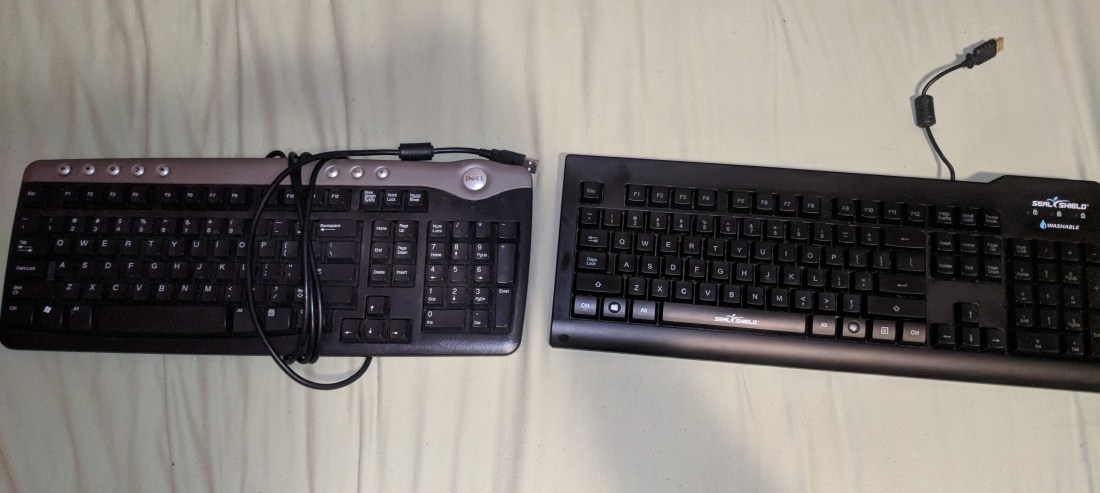
IMAGE: left: regular length keyboard cord. right: waterproof keyboard cord.

So now the question is: How does the keyboard perform? Does it deliver on its promises?

Let’s find out shall we?


By plugging it in we can confirm that the keyboard does have a working backlight! Definitely not something you can usually find at the $4 price point. You can also turn the backlight on or off at the press of a button. Pretty neat-o mosquito if you ask me.

Now let’s get to the fun part:


Note that this keyboard doesn’t actually claim that it is waterproof, but it does claim to be dishwasher safe. So we should be able to extrapolate that it is waterproof right? Just to be sure, I’m about to get this keyboard absolutely soaked in a series of tests.

For science of course.

Test #1: Spill Test

test1gif

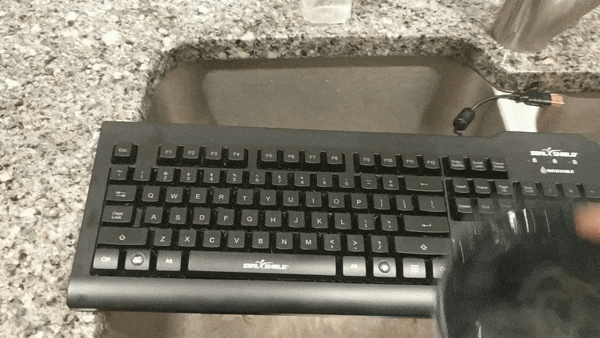
Scenario: This test is to simulate the effect a spilled cup of water has on this keyboard.

Method: My method of testing is to pour 8 oz of room temperature water over the top of the keyboard, and then seeing if it will still function normally without giving it time to dry.

Hypothesis: If this keyboard claims to be dishwasher safe, this should be a walk in the park.

Results: Pass! After testing every key on the keyboard, it is still completely functional.

Although most scientific tests include a control to verify the results of the experiment, I am going to save the time and just tell you that a normal keyboard would not pass this test. You can just take my 6 years of IT experience and the word of the 100’s of customers I have assisted who’ve spilled liquid on their keyboard and had to buy a new one. Still don’t believe me? Feel free to conduct your own test right now, and I will see you tomorrow when you come in to recycle your keyboard, and help you pick out a new one 🙂

Test #2: Hot Spill Test

test2gif

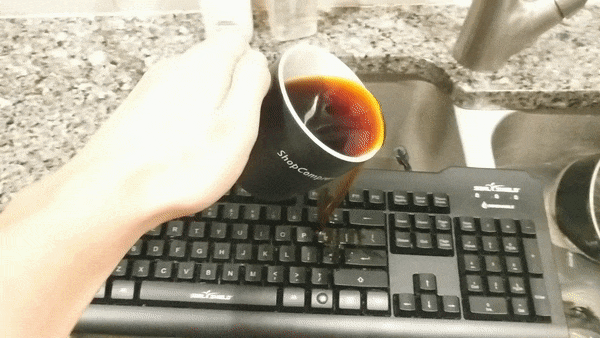
Scenario: It’s 3AM and that term paper you procrastinated on all week is due at 8:30, you go to take a sip of your coffee but accidentally knock it over and spill all over your keyboard! Will you be able to finish the essay in time?

This test will see if this keyboard’s waterproofing substance can hold up against hot liquids.

Method: Pour 8 oz of hot coffee on the top of the keyboard.

Hypothesis: Dishwasher water gets pretty hot, so once again I am going to say it will pass.

Results: Pass! Every key once again proved 100% functional.

If anyone is worried about this test being a waste of coffee, please rest assured knowing  it was decaf. It was a waste to begin with.

Test #3: Dishwasher Test

test3gif.gif

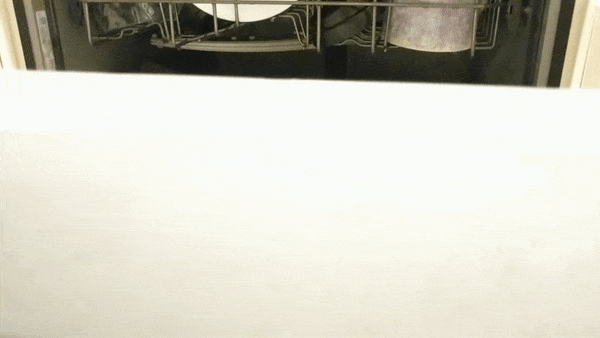
Scenario: Time to see if this keyboard can deliver on its promise of being ‘Dishwasher Safe’. That’s a sentence I never thought I would have to type.

Method: Run the keyboard through the dishwasher on the “normal” setting using the usual amount of detergent.

Hypothesis: This keyboard hasn’t disappointed me yet, and I don’t think it’s going to now.

Results: Pass! Is it bad that I am starting to hope this keyboard fails?

This is a real win for all you germophobes out there.

Test #4: Submersion Test

test4gif.gif

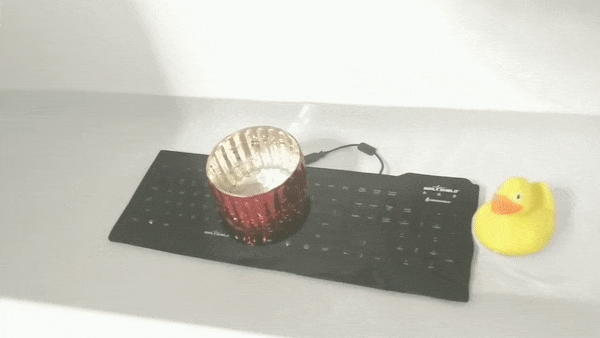
Scenario: So far this keyboard has survived everything we’ve thrown at it, now it’s time for a real challenge.

Method: Fully submerge the keyboard in hot bathwater for 1 hour.

Hypothesis: I think this is going to be it for Mr.(or Mrs.)Keyboard. Even waterproof electronics are not designed for prolonged exposure to water.

Results: PASS! Now that is impressive! A full hour of exposure and it still works perfectly!

As an added bonus, I discovered that this keyboard also floats!

IMG_20181218_234943

Perfect for tech-savvy boaters who need an extra flotation device, as long as the person you are throwing it to is less than 8 inches away.

Conclusion

As a result of our less-than scientific tests, we can conclude with confidence that this keyboard is indeed waterproof.

For $4, I can definitely say that this keyboard is worth the money. Waterproofing may be a silly feature to have on a keyboard, but it’s better to have it and not need it than to need it and not have it.

I recommend this keyboard to medical professionals who need to have the ability to sanitize their equipment, clumsy college students, people who like to watch Netflix in the bathtub, novelists who like to write in the rain, scuba diving bloggers, and fish.


Thanks for reading!

-B

Repair: NES Blinking Light

The Nintendo Entertainment System (NES for short) saw widespread release in the US in 1986, and quickly became the best selling video game console of its time. Although the 8-bit technology is now outdated, plenty of people still love to enjoy the classic titles released on this system such as Super Mario Bros. and The Legend of Zelda. However, after many years of use most of these machines fall victim to dust and debris getting clogged in the game cartridge reader causing no image to be displayed and a blinking red power light. In this simple tutorial, I will show you how to replace the 72-pin game cartridge reader so you can experience the nostalgia of playing some of your favorite childhood games.

ezgif.com-gif-maker

Difficulty: Novice

Time: 10 – 15 Min

Total Cost: ~$10

You will need:

mats

• Phillips Head Screwdriver (PH2)

• A new 72-pin connector(amazon link)

• Isopropyl Alcohol (As close to 100% as possible)

• A Cotton Swab


Start by disconnecting the NES from any source of power, then flip the device so the bottom is facing up.

Step1

Now we will begin the disassembly process. Start by removing the (6) screws from the bottom panel. After all of the screws have been removed, flip the console over and gently remove the top half of the shell.

IMG_20181206_221822


The device should now be in two pieces, set the top of the shell aside.

Shift your focus to the bottom half of the enclosure and locate the (9) screws we need to remove to separate the metal RF shield from the cartridge reader and main board.


After removing all of the screws, lift the metal shielding off of the bottom assembly.

Now locate and remove the (6) screws securing the cartridge slot to the main board.

(NOTE: On reassembly, verify that the cartridge reader sticks down when depressed. If it doesn’t, loosen the two forward-most screws until it does)

step4

Gently remove the cartridge holder from the main board by pulling away from the back of the device while lifting at a 30 degree angle. Do not force this step. If there is any resistance, just try different angles until it can be removed with ease.

main board.jpg

Almost done! You should now just be left with the main board and the 72-pin cartridge reader. Now is a good time to blow out the system with compressed air to get rid of all that dust from the 80’s. Unless you are sentimental about that kind of thing.

step5

Without unplugging any cables, gently lift the main board out of the lower shell until the 72-pin connector has enough room to be disconnected. If there is any resistance, double check to ensure you have removed all of the screws. Slowly push the old 72-pin connector off of the main board by placing your thumbs on the plastic tabs next to it.

seperated connector

Whew, the hard part is over! At this point we are ready to attach the new 72-pin connector. Some people have success after just cleaning the 72-pin connector with alcohol, unfortunately I was not one of those lucky people. If you wish to try this, follow the next step and then reassemble your machine to test it. If you aren’t feeling lucky today, skip the next step and continue on ahead.

step6(optional).jpg

Using an alcohol soaked cotton swap, clean the two circled areas of your 72-pin connector (extra dirty connectors may need multiple cotton swabs) and let the alcohol COMPLETELY evaporate before reassembly. If it still smells like alcohol, it is not completely evaporated. You may also want to clean the board as shown in the next step too but after that you are done! Reassemble your machine and test it by loading in a cartridge. If you are still greeted by the same issue, you will have to follow the rest of the steps to completely replace the connector.

step6

Using a rag or cotton swab soaked with alcohol, clean the contacts on the board shown in the image above. There are also contacts underneath the board so make sure to get those as well. Let the alcohol COMPLETELY evaporate before moving onto the next step. If it still smells like alcohol, it hasn’t evaporated yet.

step7

Finally, install your new 72-pin connector onto the main board by sliding the double sided section onto the main board where the contacts are. Ensure that the plastic tabs are close to the main board so you know the connector is orientated correctly.

(NOTE: After installing my 72-pin connector, I still had to play with the positioning of the game in order to get it to display correctly. I found that inserting the game too far into the console will cause it to glitch out. The halfway mark was about the sweet spot for my console.)

You made it to the end! That wasn’t so hard was it? Now follow the steps in reverse order to re-assemble your machine so you can stomp on some turtles with everyone’s favorite Italian plumber! (Seriously someone needs to call PETA, that dude is a psycho.)

Neato Completeo.jpg

I hope you enjoyed this tutorial! Please leave feedback as to how I can better my content.

-B

Technology: Past, Present, and Future

Hey I’m Brian,

I’m a college student and technology enthusiast, but let’s cut to the chase:

Technology is a bridge to both the past, and the future of our world. In the digital age we live in, we can find information about anything we want with just a few keystrokes. We can learn a new language, connect with new friends, develop new skills, but for some reason all we want to do is watch videos of cats wearing a piece of bread around their head.

The wonders of technology at work.

This blog is going to be dedicated to some of the neat projects I am going to (attempt) to make as well as a way to share (brag about) some of the interesting pieces of technology I have amassed over the years.

Since its my first post and I am feeling pretty lazy, let’s go with the latter for today.

Before we continue, it is important that you know that I am an avid gamer. I collect video games and consoles across many generations. I was talking to my grandfather a while back about how video games are becoming more and more lifelike every year with constantly improving graphics and VR technologies when to my surprise, he revealed to me that he was somewhat of a gamer himself! After announcing this he then disappeared out into his garage for about ten minuets, coming back with a Macintosh Apple II computer, complete with games and a joystick all inside the original box. I was in nerd heaven.

gpa

To my amazement, the old machine still functioned perfectly. We played some old games together and he talked to me about some of his favorites. It was a real wholesome moment. We even had a good laugh when we found the receipt at the bottom of the box listing the original price of this computer at $3,000 (including games and accessories).

It’s really amazing how something so old can bridge the generational gap so easily, and allow a 70 year old to relate with his 20 year old grandson through a hobby they didn’t even know they shared.

We really underestimate the power of technology, and the memories we create through it. To see how far we’ve come since the pixelated graphics of my grandfather’s era, compared to the crisp 4K renders of the current games available is absolutely dumbfounding. I just hope someday I can have a moment like this with my grand-kids, when I can whip out the old Xbox One and have them laugh at the now antiqued graphics of Halo, while I crack a smile thinking about the nostalgic memories I made with my friends all those years ago.

Well that’s it for today I guess, I’m going to try to make my next post a little more high effort so stay tuned!

-B